Manage Identity and Access Management on Azure Storage SFTP

Identity and Access Management (IAM) is a crucial aspect of managing data in any cloud environment. Microsoft Azure offers a comprehensive IAM solution that helps organizations secure their data stored on Azure Storage and manage access to it. In this article, we will discuss how to manage IAM for Azure Storage SFTP write.
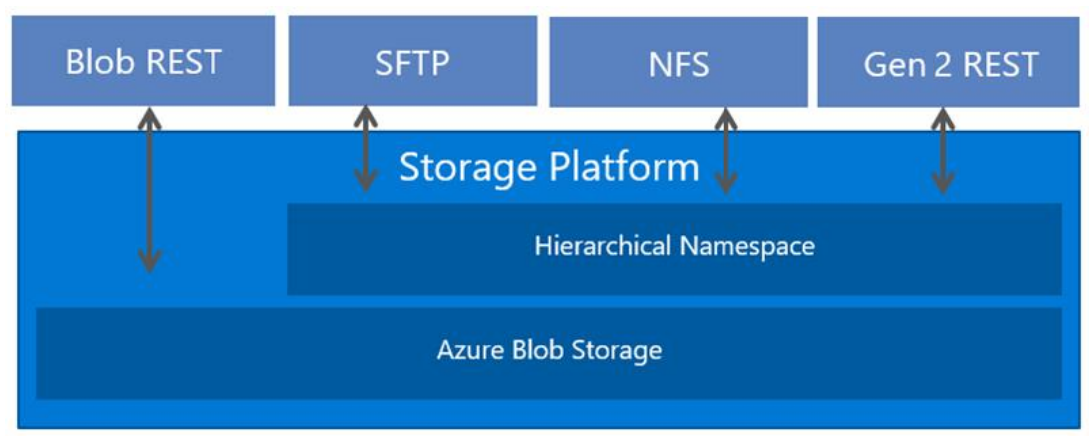
SFTP support requires hierarchical namespace to be enabled. Hierarchical namespace organizes objects (files) into a hierarchy of directories and subdirectories in the same way that the file system on your computer is organized. The hierarchical namespace scales linearly and doesn’t degrade data capacity or performance.
Different protocols are supported by the hierarchical namespace. SFTP is one of these available protocols. The following image shows storage access via multiple protocols and REST APIs. For easier reading, this image uses the term Gen2 REST to refer to the Azure Data Lake Storage Gen2 REST API.

Azure Storage SFTP is a secure file transfer protocol that allows users to securely transfer files to and from Azure Blob storage using the SFTP protocol. This feature is particularly useful for organizations that require secure file transfer capabilities for their business operations. However, to ensure that the data remains secure, it is important to manage access to the storage account and implement appropriate IAM controls.
The first step in managing IAM for Azure Storage SFTP write is to create an Azure Storage account. Azure Storage offers different types of storage accounts, including Blob storage, File storage, Queue storage, and Table storage. Depending on the requirements of your organization, you can choose the appropriate storage account type. Once the storage account is created, you can proceed with setting up IAM controls for the SFTP write operation.
Azure Storage SFTP write operation requires a user account with write permissions to the storage account. The first step in managing IAM for Azure Storage SFTP write is to create a user account with the necessary permissions. Azure Storage supports different authentication methods, including Azure Active Directory (Azure AD), Shared Access Signatures (SAS), and Shared Key.
Azure AD is the recommended authentication method for managing IAM for Azure Storage SFTP write. Azure AD enables you to manage user accounts and permissions centrally, and provides additional security features such as Multi-Factor Authentication (MFA) and Conditional Access. To use Azure AD authentication for Azure Storage SFTP write, you need to create a user account in Azure AD and assign the necessary permissions to the storage account.
To create a user account in Azure AD, you can use the Azure portal or Azure AD PowerShell module. Once the user account is created, you can assign the necessary permissions to the storage account using the Azure portal. To do this, navigate to the Access control (IAM) tab of the storage account and click on the Add button. From the Add pane, select the role that you want to assign to the user account (e.g., Storage Blob Data Contributor), and then select the user account from the list of available users.
Alternatively, you can also use Azure AD groups to manage access to the storage account. By creating a group and adding users to it, you can assign permissions to the group instead of individual users. This approach simplifies access management and enables you to easily manage permissions for multiple users.
In addition to Azure AD, you can also use Shared Access Signatures (SAS) and Shared Key authentication methods for managing IAM for Azure Storage SFTP write. SAS enables you to grant temporary access to the storage account or a specific container or blob, while Shared Key authentication requires a key to be provided for each request to the storage account.
Once you have set up the appropriate IAM controls for Azure Storage SFTP write, you can proceed with configuring the SFTP client to connect to the storage account. Azure Storage SFTP supports different SFTP clients, including WinSCP, FileZilla, and Cyberduck. To configure the SFTP client, you need to provide the following information:
- Hostname: This is the name of the storage account in the format “storagename.blob.core.windows.net”.
- Port number: This is the SFTP port number, which is 22 by default.
- Username: This is the name of the user account that you created earlier.
- Password: This is the password for the user account.
Once the SFTP client is configured, you can use it to securely transfer files to and from Azure.


