Migrate SQL Server to an Azure SQL Managed Instance online using DMS

In this POC, you migrate the Adventureworks2012 database from an on-premises instance of SQL Server to a SQL Managed Instance with minimal downtime by using Azure Database Migration Service.
Important
For online migrations from SQL Server to SQL Managed Instance using Azure Database Migration Service, you must provide the full database backup and subsequent log backups in the SMB network share that the service can use to migrate your databases. Azure Database Migration Service does not initiate any backups, and instead uses existing backups, which you may already have as part of your disaster recovery plan, for the migration. Be sure that you take backups using the WITH CHECKSUM option. Each backup can be written to either a separate backup file or multiple backup files. However, appending multiple backups (i.e. full and t-log) into a single backup media is not supported. Finally, you can use compressed backups to reduce the likelihood of experiencing potential issues associated with migrating large backups.
Note
Using Azure Database Migration Service to perform an online migration requires creating an instance based on the Premium pricing tier.
Important
For an optimal migration experience, Microsoft recommends creating an instance of Azure Database Migration Service in the same Azure region as the target database. Moving data across regions or geographies can slow down the migration process and introduce errors.
Important
Reduce the duration of the online migration process as much as possible to minimize the risk of interruption caused by instance reconfiguration or planned maintenance. In case of such an event, the migration process will start from the beginning. In the case of planned maintenance, there is a grace period of 36 hours before the migration process is restarted.
Tip
When you migrate databases to Azure by using Azure Database Migration Service, you can do an offline or an online migration. With an offline migration, application downtime starts when the migration starts. With an online migration, downtime is limited to the time to cut over at the end of migration. We suggest that you test an offline migration to determine whether the downtime is acceptable; if not, do an online migration.
This article describes an online migration from SQL Server to a SQL Managed Instance. For an offline migration, see Migrate SQL Server to a SQL Managed Instance offline using DMS.
Prerequisites
- Create a Microsoft Azure Virtual Network for Azure Database Migration Service by using the Azure Resource Manager deployment model, which provides site-to-site connectivity to your on-premises source servers by using either ExpressRoute or VPN. Learn network topologies for SQL Managed Instance migrations using Azure Database Migration Service. For more information about creating a virtual network, see the Virtual Network Documentation, and especially the quick start articles with step-by-step details.
Note
During virtual network setup, if you use ExpressRoute with network peering to Microsoft, add the following service endpoints to the subnet in which the service will be provisioned:
- Target database endpoint (for example, SQL endpoint, Cosmos DB endpoint, and so on)
- Storage endpoint
- Service bus endpoint
This configuration is necessary because Azure Database Migration Service lacks internet connectivity.
If you don’t have site-to-site connectivity between the on-premises network and Azure or if there is limited site-to-site connectivity bandwidth, consider using Azure Database Migration Service in hybrid mode (Preview). Hybrid mode leverages an on-premises migration worker together with an instance of Azure Database Migration Service running in the cloud. To create an instance of Azure Database Migration Service in hybrid mode, see the article Create an instance of Azure Database Migration Service in hybrid mode using the Azure portal.
Important
Regarding the storage account used as part of the migration, you must either:
- Choose to allow all network to access the storage account.
- Turn on subnet delegation on MI subnet and update the Storage Account firewall rules to allow this subnet.
- Ensure that your virtual network Network Security Group rules don’t block the outbound port 443 of ServiceTag for ServiceBus, Storage and AzureMonitor. For more detail on virtual network NSG traffic filtering, see the article Filter network traffic with network security groups.
- Configure your Windows Firewall for source database engine access.
- Open your Windows Firewall to allow Azure Database Migration Service to access the source SQL Server, which by default is TCP port 1433. If your default instance is listening on some other port, add that to the firewall.
- If you’re running multiple named SQL Server instances using dynamic ports, you may wish to enable the SQL Browser Service and allow access to UDP port 1434 through your firewalls so that Azure Database Migration Service can connect to a named instance on your source server.
- If you’re using a firewall appliance in front of your source databases, you may need to add firewall rules to allow Azure Database Migration Service to access the source database(s) for migration, as well as files via SMB port 445.
- Create a SQL Managed Instance by following the detail in the article Create a SQL Managed Instance in the Azure portal.
- Ensure that the logins used to connect the source SQL Server and the target SQL Managed Instance are members of the sysadmin server role.
- Provide an SMB network share that contains all your database full database backup files and subsequent transaction log backup files, which Azure Database Migration Service can use for database migration.
- Ensure that the service account running the source SQL Server instance has write privileges on the network share that you created and that the computer account for the source server has read/write access to the same share.
- Make a note of a Windows user (and password) that has full control privilege on the network share that you previously created. Azure Database Migration Service impersonates the user credential to upload the backup files to Azure Storage container for restore operation.
- Create an Azure Active Directory Application ID that generates the Application ID key that Azure Database Migration Service can use to connect to target Azure Database Managed Instance and Azure Storage Container. For more information, see the article Use portal to create an Azure Active Directory application and service principal that can access resources.
Note
The Application ID used by the Azure Database Migration Service supports secret (password-based) authentication for service principals. It does not support certificate-based authentication.
Note
Azure Database Migration Service requires the Contributor permission on the subscription for the specified Application ID. Alternatively, you can create custom roles that grant the specific permissions that Azure Database Migration Service requires. For step-by-step guidance about using custom roles, see the article Custom roles for SQL Server to SQL Managed Instance online migrations.
- Create or make a note of Standard Performance tier, Azure Storage Account, that allows DMS service to upload the database backup files to and use for migrating databases. Make sure to create the Azure Storage Account in the same region as the Azure Database Migration Service instance is created.
Note
When you migrate a database that’s protected by Transparent Data Encryption to a managed instance by using online migration, the corresponding certificate from the on-premises or Azure VM SQL Server instance must be migrated before the database restore. For detailed steps, see Migrate a TDE cert to a managed instance.
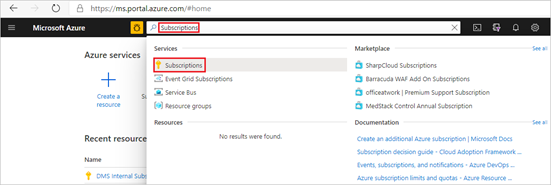
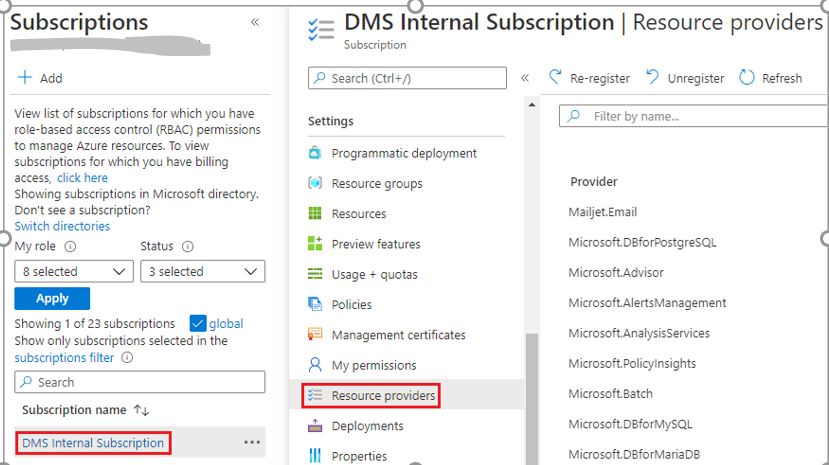
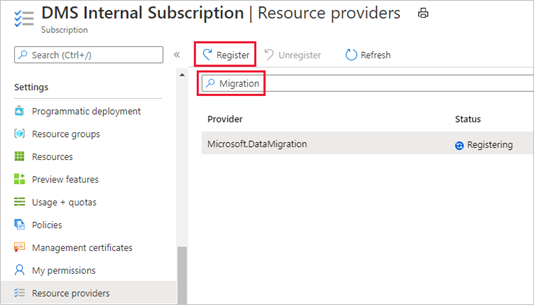
Register the Microsoft.DataMigration resource provider
- Sign into the Azure portal. Search for and select Subscriptions.
2. Select the subscription in which you want to create the instance of Azure Database Migration Service, and then select Resource providers.
3. Search for migration, and then select Register for Microsoft.DataMigration.
Create an Azure Database Migration Service instance
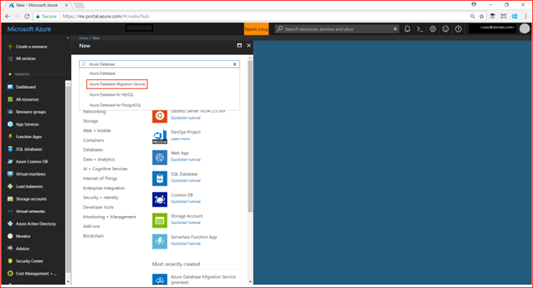
- In the Azure portal, select + Create a resource, search for Azure Database Migration Service, and then select Azure Database Migration Service from the drop-down list.
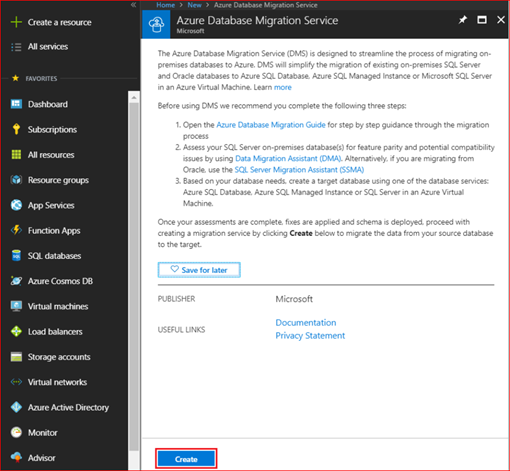
2. On the Azure Database Migration Service screen, select Create.
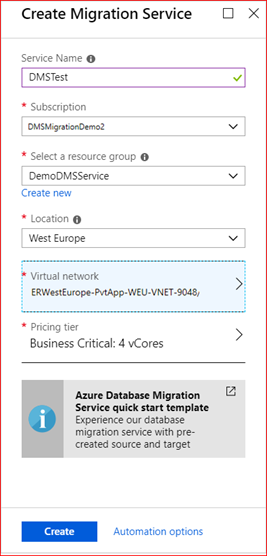
3. On the Create Migration Service screen, specify a name for the service, the subscription, and a new or existing resource group.
4. Select the location in which you want to create the instance of DMS.
5. Select an existing virtual network or create one.
The virtual network provides Azure Database Migration Service with access to the source SQL Server and targets SQL Managed Instance.
For more information on how to create a virtual network in the Azure portal, see the article Create a virtual network using the Azure portal.
For additional detail, see the article Network topologies for SQL Managed Instance migrations using Azure Database Migration Service.
6. Select an SKU from the Premium pricing tier.
Note
Online migrations are supported only when using the Premium tier. For more information on costs and pricing tiers, see the pricing page
7. Select Create to create the service.
After an instance of the service is created, locate it within the Azure portal, open it, and then create a new migration project.
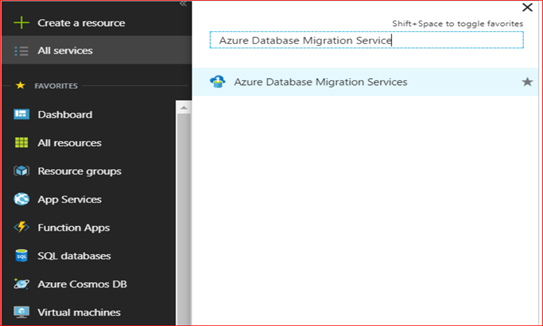
- In the Azure portal, select All services, search for Azure Database Migration Service, and then select Azure Database Migration Services.
2. On the Azure Database Migration Service screen, search for the name of the instance that you created and then select the instance.
3. Select + New Migration Project
4. On the New migration project screen, specify a name for the project, in the Source server type text box, select SQL Server, in the Target server type text box, select Azure SQL Managed Instance, and then for Choose type of activity, select Online data migration.
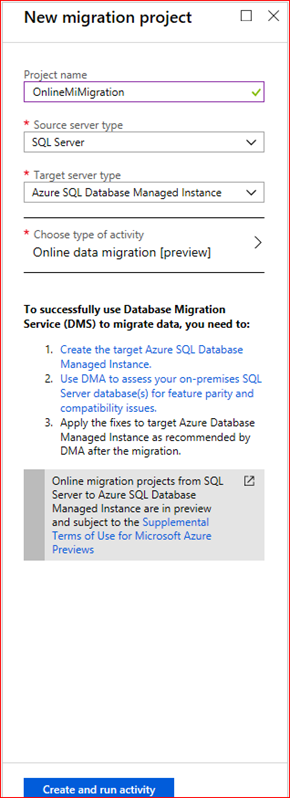
5. Select Create and run activity to create the project.
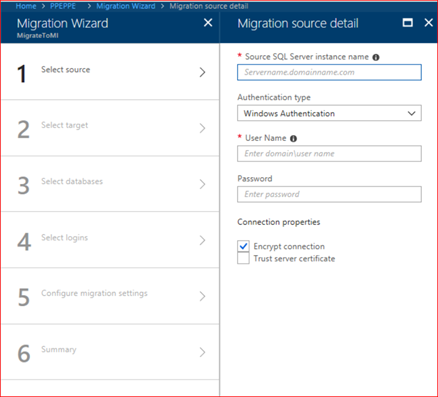
- On the Migration source detail screen, specify the connection details for the source SQL Server.
- If you haven’t installed a trusted certificate on your server, select the Trust server certificate check box.
- When a trusted certificate isn’t installed, SQL Server generates a self-signed certificate when the instance is started. This certificate is used to encrypt the credentials for client connections.
Caution
TLS connections that are encrypted using a self-signed certificate do not provide strong security. They are susceptible to man-in-the-middle attacks. You should not rely on TLS using self-signed certificates in a production environment or on servers that are connected to the internet.
3. Select Save
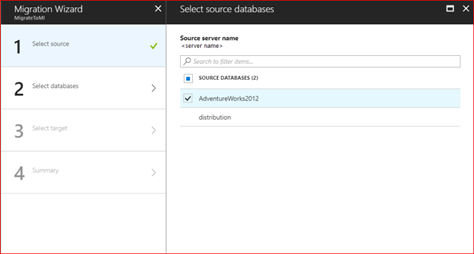
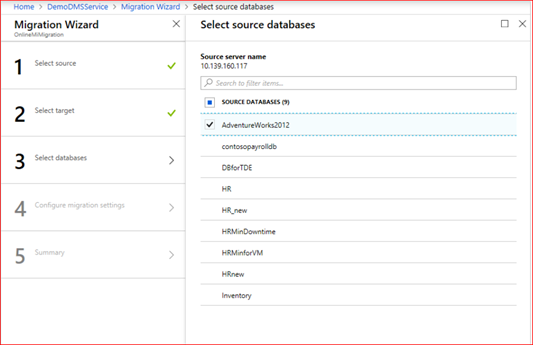
4. On the Select source databases screen, select the Adventureworks2012 database for migration.
Important
If you use SQL Server Integration Services (SSIS), DMS does not currently support migrating the catalog database for your SSIS projects/packages (SSISDB) from SQL Server to SQL Managed Instance. However, you can provision SSIS in Azure Data Factory (ADF) and redeploy your SSIS projects/packages to the destination SSISDB hosted by SQL Managed Instance. For more information about migrating SSIS packages, see the article Migrate SQL Server Integration Services packages to Azure.
5. Select Save.
- On the Migration target details screen, specify the Application ID and Key that the DMS instance can use to connect to the target instance of SQL Managed Instance and the Azure Storage Account.
For more information, see the article Use portal to create an Azure Active Directory application and service principal that can access resources.
2. Select the Subscription containing the target instance of SQL Managed Instance, and then select the target instance.
If you haven’t already provisioned the SQL Managed Instance, select the link to help you provision the instance. When the SQL Managed Instance is ready, return to this specific project to execute the migration.
3. Provide SQL User and Password to connect to the SQL Managed Instance.
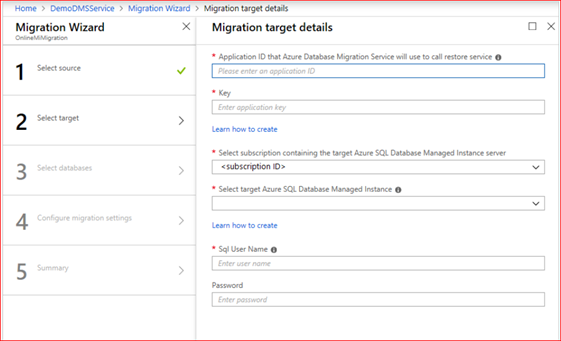
4. Select Save.
- On the Select source databases screen, select the source database that you want to migrate.
2. Select Save.
| TABLE 1 | |
| Parameter | Description |
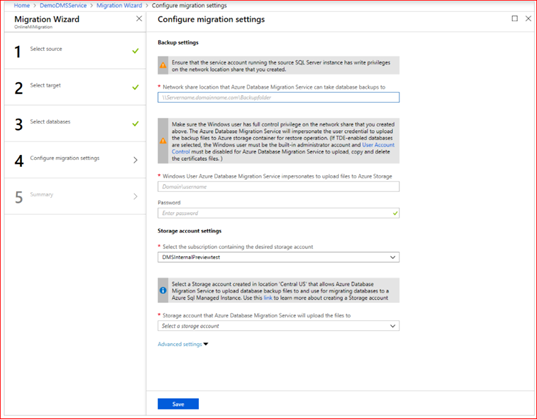
| SMB Network location share | The local SMB network share or Azure file share contains the Full database backup files and transaction log backup files that Azure Database Migration Service can use for migration. The service account running the source SQL Server instance must have read\write privileges on this network share. Provide an FQDN or IP address of the server in the network share, for example, ‘\\servername.domainname.com\backupfolder’ or ‘\\IP address\backupfolder’. For improved performance, it’s recommended to use a separate folder for each database to be migrated. You can provide the database-level file share path by using the Advanced Settings option. If you are running into issues connecting to the SMB share, see SMB share. |
| Username | Make sure that the Windows user has full control privilege on the network share that you provided above. Azure Database Migration Service will impersonate the user credential to upload the backup files to Azure Storage container for the restore operation. If using Azure File share, use the storage account name pre-pended with AZURE\ as the username. |
| Password | Password for the user. If using Azure file share, use a storage account key as the password. |
| Subscription of the Azure Storage Account | Select the subscription that contains the Azure Storage Account. |
| Azure Storage Account | Select the Azure Storage Account that DMS can upload the backup files from the SMB network share to and use for database migration. We recommend selecting the Storage Account in the same region as the DMS service for optimal file upload performance. |
Note
If Azure Database Migration Service shows the error ‘System Error 53’ or ‘System Error 57’, the cause might result from an inability of Azure Database Migration Service to access Azure file share. If you encounter one of these errors, please grant access to the storage account from the virtual network using the instructions here.
Important
If loopback check functionality is enabled and the source SQL Server and file share are on the same computer, then the source won’t be able to access the files hare using FQDN. To fix this issue, disable loopback check functionality using the instructions here.
Select Save.
- On the Migration summary screen, in the Activity name text box, specify a name for the migration activity
- Review and verify the details associated with the migration project.
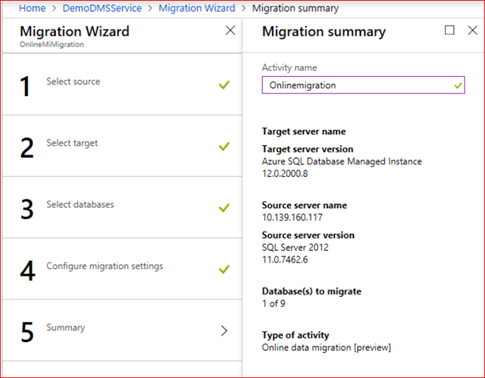
- Select Run migration.
- On the migration activity screen, select Refresh to update the display.
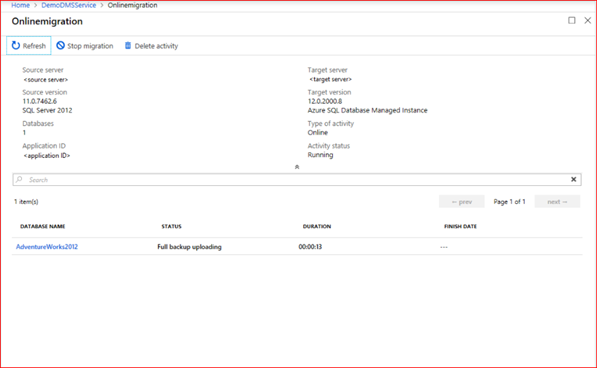
You can further expand the databases and logins categories to monitor the migration status of the respective server objects.
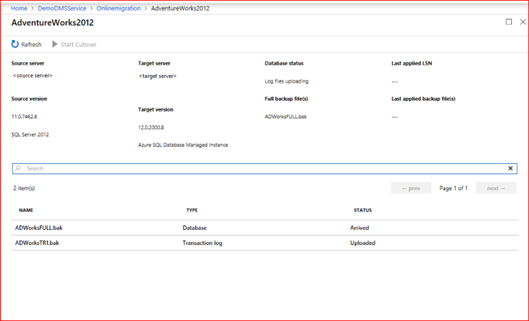
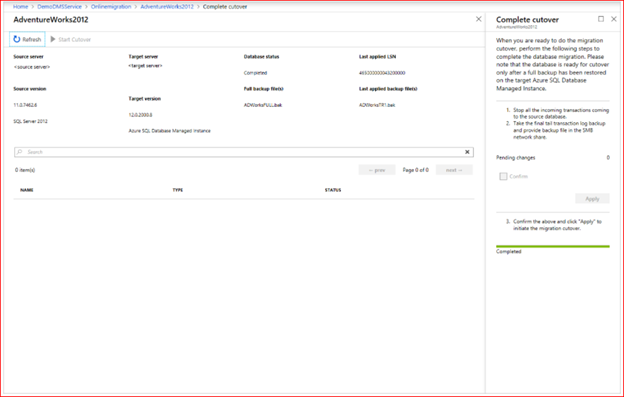
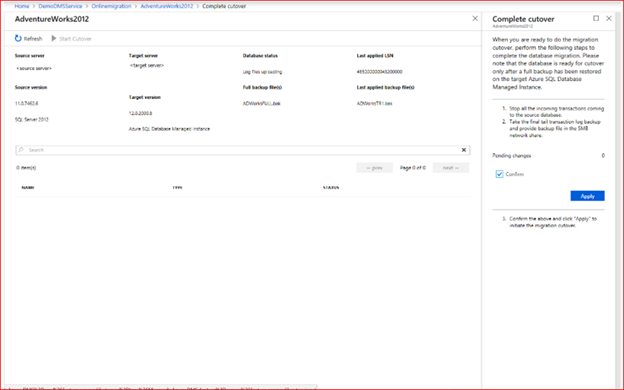
After the full database backup is restored on the target instance of SQL Managed Instance, the database is available for performing a migration cutover.
- When you’re ready to complete the online database migration, select Start Cutover.
- Stop all the incoming traffic to source databases
- Take the [tail-log backup], make the backup file available in the SMB network share, and then wait until this final transaction log backup is restored.At that point, you’ll see Pending changes set to 0.
- Select Confirm, and then select Apply.
Important
After the cutover, availability of SQL Managed Instance with Business-Critical service tier only can take significantly longer than General Purpose as three secondary replicas must be seeded for AlwaysOn High Availability group. This operation duration depends on the size of data, for more information see Management operations duration.
5. When the database migration status shows Completed, connect your applications to the new target instance of SQL Managed Instance.